Saturday, November 26, 2011

RANT: Smart Casual.

There are two words that I absolutely hate to hear together, the first being ‘smart’ and the second being ‘casual’. I absolutely dread attending events that select ‘smart casual’ as the dress code for a number of reasons, although the top three would have to be:

1. Wear a nice shirt.

I always get advised to “wear a nice shirt and jeans / skirt” to a smart casual event. I don’t even know why people would think this is helpful advice because I happen to think all my shirts / jeans / skirts / whatever are nice, in fact, that’s why I wear them in the first place. Despite this, if I turned up in my Comedian shirt (yes, I am a huge ‘Watchmen’ fan) I don’t think anyone would be too impressed.

2. The smart casual continuum.

There are varying levels of smart casual dress and I never seem to hit on the right one for the event – I always feel too overdressed or underdressed. I’ve also noticed that it is a rarity for a majority of the individuals at an event to be at the same level of ‘smart casual’. Usually you can always pick out the individuals who are slightly too overdressed or those who are underdressed. In most cases, I am either slightly overdressed or I am wearing an entirely different style of ‘smart casual’ then everyone else.

3. My wardrobe is basically empty.

Okay, in reality I have a huge amount of clothing, in fact, some may say too much, however, when someone tells me I am required to wear ‘smart casual’, I draw absolute blanks. Not one single outfit instantly jumps out at me going ‘pick me, pick me’. It takes a frustratingly long time for me to decide on an outfit.

Now this may seem a rather odd topic for me to rant about, however, I am attending an smart casual event with my partner in a week time, the event being his cousins engagement party. While I have met my partner’s immediate family (Mother, father, siblings) (and not only like them, but have been received warmly and with approval), I have not met any of his extended family and am quite nervous about this thus I would like to make a good impression. Some people may find it silly to worry about something like this, however, let’s face it, it’s nice to know that your partner’s family approve of you. Since I’m probably not going to be an amazing conversationalist that night (I’m generally quite shy around people I meet), I’d like to at least look nice.

Now according to Wikipedia (obviously the most reliable source of information), smart casual dress for a woman is defined as "slacks or a skirt (long or short), a blouse or turtleneck, a fashionable belt, a jacket, a vest or sweater coordinated to the outfit, hosiery or socks with boots, flats (leather, suede or fabric) or mid-heel shoes" which may be complimented by "jewellery, such as earrings".

Taking that definition, I decided to look into my wardrobe and see what I could come up with. Now, while the term slacks refers to trousers, I only own one black pair that are not jeans and these are ones that I purchased to wear while performing waitress duties while on work placement for hospitality. This lead me to cross that off the list and move on to skirts. My skirt selection was equally depressing with the grand total of two of them being short and black (one being covered in black lace and the other somewhat representing a tutu). I don't own any turtle necks and I only wear grandpa sweaters. My blouse selection is rather varied, however, a majority of them are oversized rather then being neatly cut. I don't wear belts at the best of times and the ones I have tend to be adorned with studs. My small collection of vests make me either represent a pirate, a member of a marching band or a waiter, I do however have a few nice blazers.

In the end I was left with the conclusion that I shall either be attending naked, or with only a blouse and blazer on. To be honest, neither of these options particularly appeal to me (what a surprise!). I personally found the definition of smart casual as one geared to an individual older then myself and therefore of little help. I'll probably be going through my wardrobe in the next couple of days in the hopes of creating an outfit, so except some degree of an update (also, more then welcome to post any helpful links / advice / whatever).

While I'll probably take the easy way out and pair a dress with a blazer and some mid-height heels, I'll still spend hours debating with myself (and my wardrobe) about what to wear. In the end, I'll probably wear the first outfit that I put together, regardless of the 347387439734 outfits I try on afterwards.

Monday, November 21, 2011

14. Vaguely Victorian!

I went to the shops with my mother to get some groceries this morning and she had to stop at our local thriftstore to donate some items. We had a quick look inside because my mother wanted to buy some photo frames and I picked up these boots for only $10! (In fact, I didn't pay a cent for them because my mother offered to buy them as she was getting my sister something). They're from a brand called 'Pinet' / by 'Verona shoes' (it says both of these inside the shoe, so not quite sure what is what). They have leather uppers.

They strike me as very Victorian looking which is what attracted me to them (plus for some reason I can picture a Witch wearing them, haha). They are a bit scuffed and have some dirty marks on them but I think I'll be able to clean them up a bit. I'm kind of excited to pair them with something, although I'm not entirely sure what. At the moment I think they're either go over some tights or paired with a dress.


Thursday, November 17, 2011

INSPIRATION: Oversized Shirt Transformations.


I really love oversized shirts and I wear a lot of them when I'm just going to university. I discovered my love of big shirts because I found I often really liked the designs on male shirts (ie. I found some shirts with 'Watchmen' characters on them that were only available in large mens, however, I just had to have them). While I usually I just pair them with either a pair of tights (particularly 'jeggings') / skinny jeans and cute shoes, I've been thinking of other ways to wear them and in particular, alter a really big shirt I want to wear which you can see here. Due to this, this inspirational post is a bit different as it has a few DIY ideas thrown in!

  • The first idea that that I saw is a video by MissJenFABULOUS on youtube. It's a very simply video that involves cutting the neck off an oversized shirt / sweatshirt in a 'boat-like' fashion so that it can be worn off the shoulder. You can view it here.
  • The second idea is a photographic walkthrough into making a 'tunic' like shirt with very large armholes, found here.
  • Another youtube video here, this time turning an old shirt into a crop top. Put together by SweetBambini.
  • Another DIY youtube video, this time turning shirts into crop tops. You can find it here. The author, Macbarbie07, also has a few ideas on how to wear the crop top after.
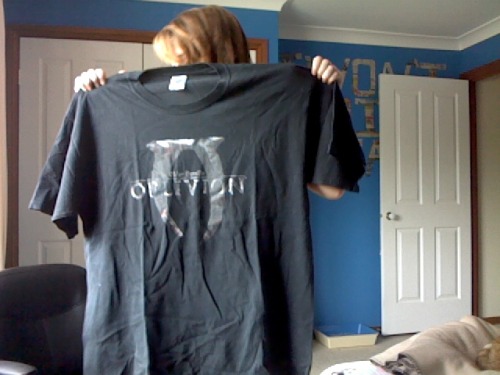
While I dislike the above shirt has a whole, this is sort of the style I'm thinking about using for my Oblivion shirt here.

Tuesday, November 15, 2011

13. Reconstructed Bead Necklace and Floral Thrift Find.

Keeping up with the revamping of my Grandma's old jewellery from this post, I've decided to reconstruct some of it (to see my 'How to give an old ring new life with nail polish' DIY / tutorial, click here). The piece I did the most work on was this:

Originally I assume it was meant to be a necklace with five matching strings of (fake) pearls. However, one string is entirely missing and the other one has been broken and then knotted to prevent any more beads from escaping. The string was incredibly old and impossible to remove from some of the beads, however, in the end I restrung them and was rewarded with two new necklaces and a bracelet. I also have a handful of small beads left over.

Above is the bracelet, haha. My cat kept getting on my lap when I was trying to take a photograph of it so I decided to let her model it. It's just on elastic which I knotted off to finish it (so no clasps). It's made with the smaller beads making up a majority of it followed by the large feature beads in the center. The next piece of jewellery (below) was a long necklace which I made out of two of the bead strings. Again, it has no clasps. I simply doubled up on the larger beads as you can see:


Piece number three is made out of only one strand of beads and has clasps on the end (I actually couldn't find the corresponding clasps so I just use two of the hooky ones on either end). Basically they all look the same, just at different lengths. I absolutely adore fake pearls (and would adore real ones if I had any, haha).

The shirt in the picture is something I thrifted today for $2. Here are a few pictures below:

Now the shirt is quite big, however, this is what I was after. I recently rediscovered my Oblivion shirt which I adore, however it's an XL and is a tent on me (a very unattractive tent). I would like to cut it up to make it smaller and thus I can feel comfortable about wearing in public. I was inspired by the second shirt I thrifted in this post and am thinking about cutting it like that so it 'ties' in the front. I dont' want to ruin the Oblivion shirt however as I would be unable to get another one (this one was passed onto me from my ex boyfriend) so I brought the above shirt to practice on.


Monday, November 14, 2011

DIY: Giving An Old Ring New Life.

Some of you may remember me making a post back in October about how my Grandmother let us go through some of her old jewellery that she was going to chuck out otherwise. In that post I mentioned coming across two rings. One was simply a plain looking silver band (probably a man's dress ring), however it was quite tarnished and black in some places. Hoping it was just dirt I used some jewellery cleaner on it in hopes it would come off, sadly it didn't so I'm just going to assume it's where the silver paint was scratched off.

Excuse the tired slack jaw look, all I have been doing is playing Skyrim - it became available on the 11/11/11 for us PC players and it's now 14/11/11 and I have already put in 30+ hours according to steam. I have no regrets.

Anyway, on tumblr I saw a post about giving new life to bobby pins by giving them a coat of nail polish (I have since lost that post and am unable to find it, if anyone knows where it is please link me!). I was curious to see if it would work with my ring so decided to give it a try. Since no one in my house is real big on nail polish I had limited choices (originally I just wanted to make it shiny silver). There were two steps involved:
  1. Paint ring in polish of selected colour / colours. It is quite likely you will need more then one coat and don't forget the inside! I left mine to dry on newspaper between coats, it seemed to dry quite fast. I think I put on about 3 coats because the red nail polish was quite weak in colour.
  2. Apply a clear coat of nail polish over the top, mine had little sparklies in it. This is just a precaution against chipping etc, which it will hopefully protect it from (to a degree anyway).
It was surprisingly hard to get a picture of it once it was all painted up, however, I'm very happy with the results. I think my favourite thing is that I could remove the nail polish and paint it a different colour if I wanted, so really, you could make it match any outfit you wanted.

This didn't cost me anything (ring was a gift as was the nail polish), and really, most people have unused rings / nail polish at home. You could also thrift some old rings and you can get nail polish really cheap at $2 stores etc (tbh, I don't think you need to waste expensive nail polish on this).

Wednesday, November 9, 2011

REVIEW: Positive Bodyline Rocking Horse Shoes.

Basic Details:
Date ordered: 3/11/2011.
Date received: 9/11/2011.
Method of shipping: AIR ($1 deal for the month of Nov 1 - 30).
Payment method: Paypal.
Items ordered: Shoes196 in black, size 235. Eye611 & eye132 (eyelashes).
Packaging: The shoes were wrapped separately in tissue paper and had things in the middle to ensure they kept their shape (as you can see in the pictures above). They don't appear to have been damaged via the shipping.
Total cost: $42 (including shipping).

The Eyelashes.
I thought that I would do these first since they're nice and quick. I love fake eyelashes, but have never used them. Instead of purchasing expensive ones and ruining them I figured I would just get some super cheap ones and practice putting them on (they were $1 each).
The last picture is of the little bottle of glue that came with each set of eyelashes. It's pretty small and no idea if it'll actually be useful for gluing, but I can't complain for a dollar. 611 (the ones in the purple and pink box), actually have purple and black lashes, something which didn't click with me when I brought them. I don't think I even own anything purple apart from these eyelashes, so I'm going to use them as a test run before wearing the plain black ones out.

Even if they don't stick very well or whatever, they cost $1 each so it was well worth the money for the practice / experience it will give me.

The Rocking Horse Shoes.
As talked about in this post, I have longed after a pair of Rocking Horse Shoes for a long time. Due to this I was really nervous about these shoes as I was worried I would be let down after such a long time. Thankfully, the opposite happened - I am absolutely overjoyed. I haven't found a single thing to complain about. The first thing I did after squeeling (in my head, I just had 3 wisdom teeth out so I'm not making any noise atm) was try them on straight away. So here's a picture with them on:
I used a variety of size converters online to convert the Japanese size into an Australian size and after getting the same answer off various websites, that's the size I chose. I purchased '235' as it's written on Bodyline which basically means 23.5cm in length. I am an Australian size 6 which is suppose to be equal to the 235, however I was expecting it to not fit very well (especially because my feet are quite broad). They fit like a dream. Not too tight, not too loose.
I don't know why but '3-' was written on the the heel in what seems to be a silver glitter-pen. I have no idea why, however, it is not visible with the shoes on. My guess is that it's some way to make sure that pairs of the same shoes don't get mixed up. You can see the rubber bottoms in the above picture and there were no imperfections with it. It seems to be attached firmly with no rough edges.
Above is a side on view (webcam not camera in this instance). When people were saying the soles were foam I did experience some concern, however, they seem very sturdy. I also feel like most people would not assume that they are foam just from looking at them. My only advice would be to avoid sharp things as they could possibly create dents within the foam (ie. if your friend has spikes on their shoes, I wouldn't knock them together with yours). I think this would be pretty unlikely though.

Now Bodyline says the heels are 7.6cm. I measured them (my boyfriend wanted to know how tall they were) and this appears to be correct. To measure, I laid my ruler along the edge created by the cut out piece of the back.
One odd thing that I did notice when looking up at the shoes is that underneath the 'ribbon' part of the bow on the front is white/cream for some reason. I only noticed it while trying to get certain angles of my shoes in photographs, so I doubt it would be noticeable in real life. If you're bothered so much you could probably just use a black marker to blend the edges. Apart from that the bow seems to have a few stitches in it to attach it to the shoe (these aren't visible unless you start lifting up bits of the bow and looking really closely at it) so I don't think they will come off any time soon (and tbh, if they did I imagine a hot glue gun would be able to fix it to a degree)

The ribbons are removable (yay!) and you can fold the metal hoops that they go through down so they cannot be seen. Since the shoe is such a good fit on me, I don't need the ribbons to keep the shoe on (as far as I can tell). I'm having so many ideas running through my head at the moment as this means that the ribbons are interchangeable. This has given me all sort of ideas including matching my ribbon to my outfits or using bits of chain to create a more 'punk' look. These are just ideas though, and I'll most likely just stick with the black for now.

Overall Opinion.
I am over the moon with these shoes and would absolutely recommend purchasing them if you are on the fence about them (although it should be noted that regardless how good of experience I have had, not everyone may experience the same thing). These are definitely worth the money that I paid for them and I can't wait to wear them. If you have any questions either drop a comment here or at my tumblr ask (anon questioning is on). I am more then happy to take extra photos of them or address any concerns in regards to them.

I was also super pleased that when I wore them downstairs to show my mother / sister, they both not only thought they were very cute, but my sister said "they look like Lolita shoes". She actually wanted to purchase a pair after seeing them for her year 10 formal, however they don't go down to her size sadly.

I've also posted this to egl, so if you wish to ask something there (or just stalk Lolita-related things) then you could do that also.

Monday, November 7, 2011

DIY: Why Bobby Pins Are Your Best Friends.

So look above. What do you see ? A bobby pin with a piece of chain attached ? Well, yes, it is that. But what else is there ?
  1. An easy way to braid something extra into your hair. Yup, all you have to do is attach the chain through a link or tie on a piece of coloured string etc. All that's left is to slide the bobby pin into your hair and use the string/chain/why you're braiding (ie. you could use it as the third piece of hair in simple braids.
  2. An easy way to attach a decoration to your hair. This could be as simple as tying a few feathers to a piece of string and attaching it to your bobby pin or making a cute string of beads to attach. If you attach a bobby pin to either end you could manipulate it into a a forehand band or headband of sorts (although probably would have to be purely decoration).
  3. A quick fix for broken jewellery. So you're out somewhere and somehow, your necklace snaps. Don't just throw it in your purse in disgust. If you have a bobby pin, push it through the links on either end of the chain and ta-da, you can wear your necklace again.
  4. Making something more fitted. Not the ideal way to do it, but if you need a quick fix to shorten some straps or to ensure a rolled up shirt stays rolled up, a bobby pin may come in handy.
  5. Cleaning under your fingernails. Okay, this sounds kind of gross, and it isn't something I would do in front of someone. But admit it, you've been out and looked down at your nails and at least one of them will have some hunk of dirt in there. Instead of obsessing about how on earth it got there, because lets face it, we'll never figure it out, take a few seconds next time you go to the bathroom / have some privacy to flick it out with a spare bobby pin.
And, if one side of my face seems funny it's because I had three wisdom teeth removed today.

Thursday, November 3, 2011

12. Rocking & Rolling.

So today marks a special point in my life today, my first proper online shopping experience. I've never personally brought something fashion related online before (I've gotten my dad to purchase a pair of earrings / a hat for me, but that's it) so I was really excited. I will definitely be posting a review of my goods when they come later on this month (I hope!) Anyway, here's the story:

When I was about 15 I discovered 'Lolita' and instantly fell in love, I was particularly fond of Sweet & Kuro Lolita. However, I had no job at the time and wasn't allowed to shop online / didn't have the confidence to wear the items so instead I would endless obsess over them online and stalk the online communities (in the least creepy sense, haha). A few times I almost brought a few items from Bodyline (a cheaper alternative for Lolita if they're not as concerned with dressing in 'brand' pieces, while some of the items are of questionable quality there has been much improvement over the years, or so I understand).

Yesterday I learnt that Bodyline was having a special - $1 shipping to anywhere, on top of that the Australian dollar is actually worth more then the US dollar atm, so I decided I would have a look. I was pretty devo to discover the shoes were sold out in my size, and in the colour I wanted. However, I ended up purchasing the above shoes in black and two pairs of fake eyelashes (I've never worn them before and these are really cheap so I won't feel bad if I ruin them).

Now, as I mentioned, the shoes weren't my first choice but there were reasonably cheap (the whole transaction cost me $42 Australian) and they were very close to what I wanted, in fact, the only difference is the lacing style. I've decided that if these are comfortable and I can actually work them into my wardrobe, then I may purchase some more.

Although, now that I am thinking of it, the ribbon lacing has got me kind of excited. I am hopping that I will be able to remove the ribbon completely and thus be able to replace it with other things, ie. different colour ribbons, ribbons with embellishments (like studs) or attach dangling things (like chains) to the loops the ribbons should attach to (it looks like the ribbons aren't actually required to hold the shoes on).

So yes, I am very, very exciting! I actually almost didn't purchase them, my boyfriend greatly encouraged me after discovering I had wanted a pair for at least 4 years. I will be posting a review when I receive them, and of course, pictures! Expect an inspiration post regarding them too!

Wednesday, November 2, 2011

11. I See Red.

Yep, that is the dress I thrifted in this post. It had a sort of an old vintagey feel to it so I thought that it might look nice with some red lipstick (my new love). This is the first time I've actually worn lipstick apart from my formal (or prom as some people call it) and one date I went on recently, even then they were very discreet colours. I have a freckle underneath my right eye and I think when I wear this outfit I will darken in to give a more dramatic look. But yes, apart from the lipstick I'm not wearing any other makeup.